Studio 9C (right)
single angle

This is a single camera view ('right') of Studio 9C.
You can also get this angle as part of the complete Studio 9C multi-angle pack).
For graphics, editing, and post-production.
Standard Photoshop file (.psd) with layers and groups.
PLUS every layer as a separate lossless PNG image.
HD (1920 x 1080 pixels)
$
49 Add to cart4K (3840 x 2160 pixels)
$
79 Add to cartSpecial Photoshop version that you can load directly into NewTek's Virtual Set Editor (required). Includes extra layers / UV gradients already set up for your Live Inputs, skyline and screens.
$
99 Add to cartChoose your format/s above
You'll receive an email with a link to download your products.
All files are zipped (.zip)
Not sure which format is best for you?
Watch this short video : virtual set file formats


Product details
Virtual set for green screen use – compatible with TriCaster VSE, vMix and most graphics and editing systems (After Effects, Premiere Pro, Final Cut, and more).
This view is designed to give you a nice shot with the right hand screen straight to camera, and can be used with sitting or standing talent. You can put your own graphics in the screen, or turn it off completely. The example skyline is included, but you can use a picture of your own instead.
The Photoshop versions have the coloured lightboxes as separate layers, so you can adjust them to match your own colour branding. (See below for more details about the vMix version).
You can watch a walkthrough video guide to Studio 9 here which describes the whole set in a bit more detail. Studio 9C is exactly the same, except the lightboxes are all coloured green!
vMix version:
The vMix version of this virtual set has 6 layers. There are dynamic layers set up for the skyline, the screen/monitor, and your talent layer, so you can select your own Input source for any of them. The screen has a surrounding frame as a separate layer (‘screen 2 edge’) – you can turn this off if you like by selecting that layer from the drop-down and unchecking ‘Visible’. You also have a ‘spare’ layer that sits in front of everything else, which might come in handy.
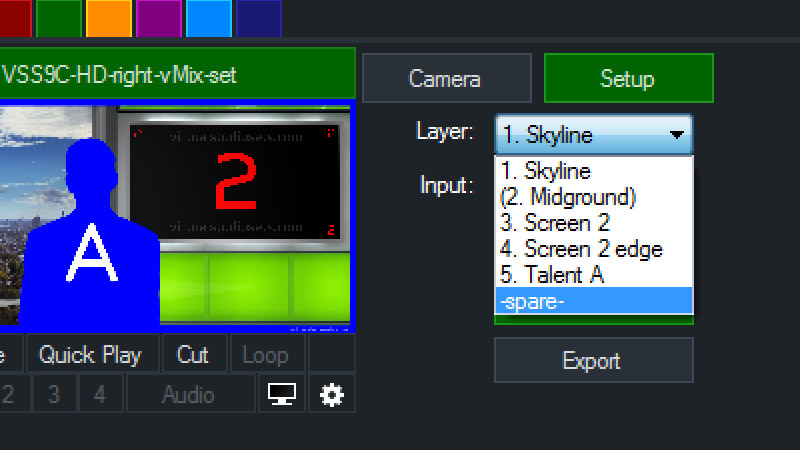
The vMix version has the green lightboxes merged with the ‘midground’ layer and will appear as shown.
Loading the virtual set into vMix:
To get a set into vMix you need to copy the folder and its contents into the directory on your vMix machine where vMix stores its sets, so it can be found alongside all the supplied vMix sets.
That might be somewhere like C: > Program Files (x86) > vMix > VirtualSets
Remember to unzip the folder first, and just double check that it’s definitely the folder that contains a file called config.xml
You might like to take a look at this video which explains in more detail how to get your virtual set into vMix : How do I get a vMix virtual set into vMix? (video).
End User License Agreement
The one-time purchase price shown above grants you a perpetual, worldwide, royalty free license. It allows for unlimited modifications, archival copies, and client use.
See details and benefits here : View EULA
Buying for a school or college?
Get 20% OFF any order with our Educational Discount. Simply enter the code EDU20 during checkout.
Need more help?
Read our Frequently Asked Questions (FAQs) and maybe your question has already been answered. Please feel free to get in touch if you need help with anything else.