Datavideo virtual sets (for TVS-1000, TVS-1200)
posted by
UPDATE: We have added some ready-made background layers that are perfect for getting started quickly with Datavideo’s Virtual Set Maker.
The special ‘quick-start’ layers are all found in the ‘PNG Layers’ folder, and are included in all of the ‘Photoshop + PNG’ packs.
There will be at least one full-frame background, and also versions with transparent ‘holes’ for screens and skylines. They make the set-up process much quicker for products like Virtual Set Maker from Datavideo. You just drop in a single layer, set up your talent and screen inputs, and if you need additional layers you can find them all in the ‘Layers’ folder. Plus you get the Photoshop version included as well, just in case you want to make your own custom changes or modifications.
The original post below uses the ‘midground’ layer from the vMix version as a base, but we’d recommend choosing the ‘Photoshop + PNG’ packs from now on if you are looking to use our sets with Datavideo TVS 1000 or similar.
(original post follows below)
I’ve recently had a few enquiries asking if our virtual sets are compatible with Datavideo TVS-1000 or TVS-1200, so I thought I’d have a quick look myself, just to see how easy it is to get started and make your own TVS virtualset.
First, I installed Datavideo’s Virtual Set Maker software (which you can get as a free download from datavideo.com). According to their site, virtual sets designed by their Virtual Set Maker can only be used for TVS-1000/TVS-1200 V1.4.8755 or above. The software is easy to install and use – you simply add in each of your layers in turn and add your ‘live’ inputs to create your virtual studio.
As far as I could tell, Datavideo virtual studio sets do NOT support the use of UV gradient layers to map images or inputs. The sets here at virtualstudiosets.com DO make use of UV gradients here and there to provide TriCaster users and vMix users with real-time reflections. There are also plugins for Adobe After Effects that can also map sources using UV gradients.
So – what does that mean for TVS-1000/1200 users? Well, all is not lost thankfully. When I built the virtual studios I tried to include as many useful options as possible. For example Studio 1 and 2 come with a desk with a transparent surface to alow the reflections to show through from behind. But I’ve also included a separate ‘opaque’ desktop layer which can be placed over the top to hide the reflections completely. Also, I’ve provided a separate background layer for the skyline which includes the reflection in the floor already built in.
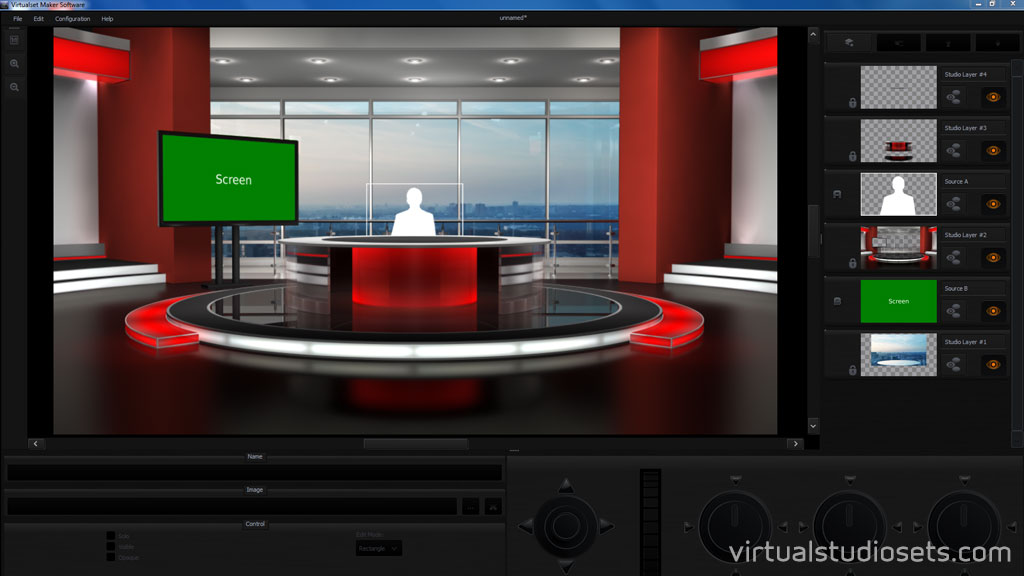
In the example image above you can see the wide angle for Studio 1. I have used the ‘midground’ layer from the vMix version to get started. Behind that layer I have positioned the ‘screen’ input by corner-pinning the green rectangle behind the plasma screen surround. And for the background layer I have used the skyline version that has the reflection built in (it comes included in the ‘PNG layers’ folder).
I’ve placed the seated talent input behind the desk layer. And finally I’ve added the ‘opaque desktop’ layer just to hide the fact that the talent layer isn’t reflected in the desktop.
All in all the result is extremely close to how it would look for a TriCaster user, or in vMix, or in Final Cut, Premiere Pro, After Effects etc.
Anyway – this was a very quick test just to see what’s involved. If you are reading this, and have already been using our virtual studios with either a TVS-1000 or TVS-1200 I would be very interested to hear (and see!) how you’ve been getting on.