Changing TriCaster virtual set colours in NewTek’s Virtual Set Editor
posted by
Our virtual sets for TriCaster are supplied in Photoshop format. They are designed to be imported into Vizrt’s (formerly NewTek’s) Virtual Set Editor (VSE) where you can turn layers on or off, adjust the colours, and assign your live inputs.
Once you’ve successfully imported the Photoshop document, you can save your virtual set as a VSE project (.lsproj) and you can create multiple versions very easily by saving each variation as a different project file.
It is important to note that our ‘TriCaster’ versions are still essentially Photoshop documents – they cannot be loaded directly into the TriCaster. You need to import them into VSE first. So, if you want to try any of our ‘TriCaster’ virtual sets, you must be running Virtual Set Editor (VSE) at your end!
OK, so let’s take a look in a little more detail, and you can see how easy it is to adjust the colours within VSE.
Virtual Set Editor (VSE) interface
When you first load your set into Virtual Set Editor you will see a list of all the available layers on the left hand side.

There’s a few things to be aware of before you start adjusting individual layers :
1) The layer list in VSE is in reverse order – so background layers appear at the top of the list, foreground layers at the bottom of the list. So each layer appears in front of the layers above it.
2) Some layers may be grouped together. Click the little triangle arrow on the left hand side to ‘unfold’ and show any layers in that group. In this example, there are two lightbox layers (lightbox color1 and lightbox color2) contained in the group called ‘lightboxes’
3) The blue ticks on the right hand side of the layer list denote if a layer is visible, or hidden. You can easily hide and show particular layers at any time by clicking the tick on or off.
Virtual Set Editor (VSE) colour settings
OK – so adjusting the colours is pretty straightforward once you get the hang of it. When you’re ready to start adjusting a particular layer you might find it easiest to turn off all the layers in front of it so you can see what you’re doing a bit more easily.
You have four sliding controls for the colour – ‘Brightness’, ‘Hue’, ‘Contrast’ and ‘Saturation’. You simply click on the area where the number appears and slide left or right to change the value. Or, you can double click to enter a numerical value by hand.
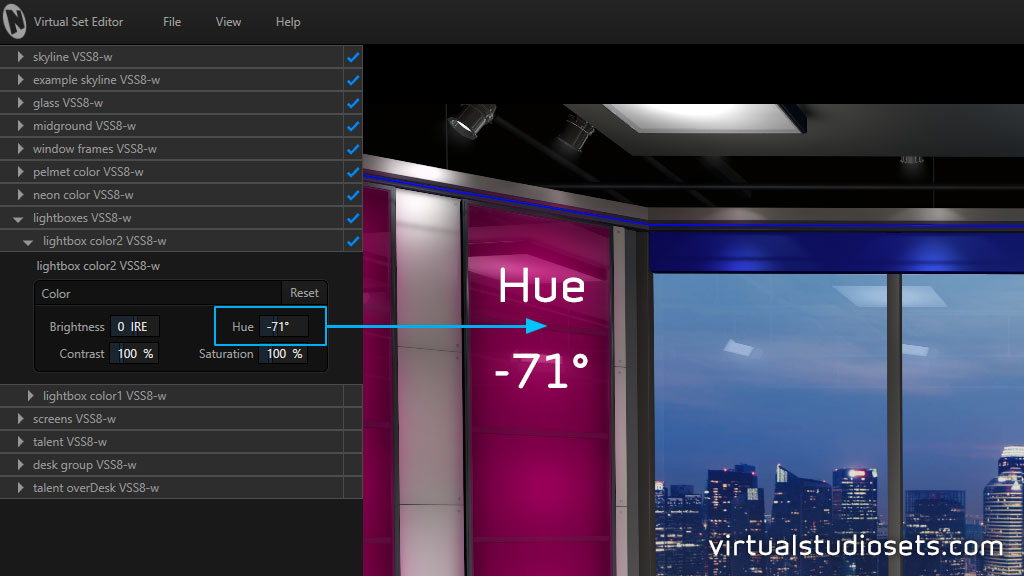
Personally, when adjusting colours I always start with the ‘Hue’ control. In the example below, I’ve used the ‘Hue’ slider only to change the colour of the ‘lightbox color2’ layer. I moved the slider left to change the hue value from 0° to -71°. This has changed the blue colour to the purple (‘grape’?) colour shown. If you’re familiar with a standard colour wheel, you’ll soon get the idea of how adjusting this value works – the default setting is zero degrees, and you can ‘rotate’ by 180 degrees in either direction. You can think of it as going around the colour wheel to the opposite side, either clockwise or anticlockwise.
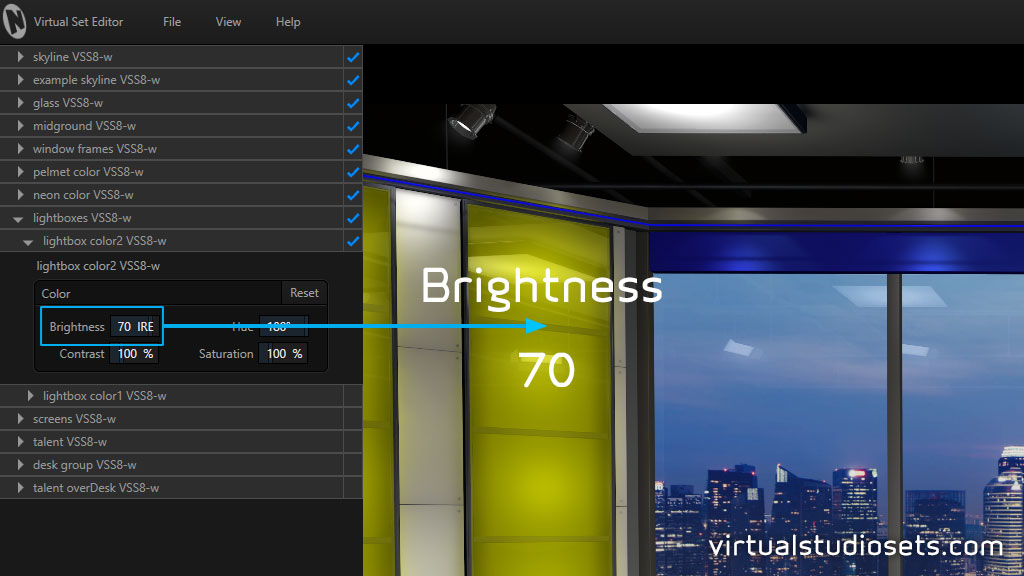
OK. Another thing to be aware of is that Virtual Set Editor doesn’t handle colour adjustments in quite the same way as Photoshop does. So, for example, In Photoshop, you would expect a fully saturated blue (RGB 0,0,255) to become yellow (RGB 255,255,0) when the hue is ‘rotated’ by 180 degrees. But you can see in this next example (below) that VSE instead gives you this very muted, dark greenish colour instead.

But if we increase the brightness using the ‘Brightness’ slider, you’ll see it’s easy enough to get to a yellow colour. The ‘hue’ was correct all along, but we just needed to bring the brightness up to get to the yellow we’re looking for.
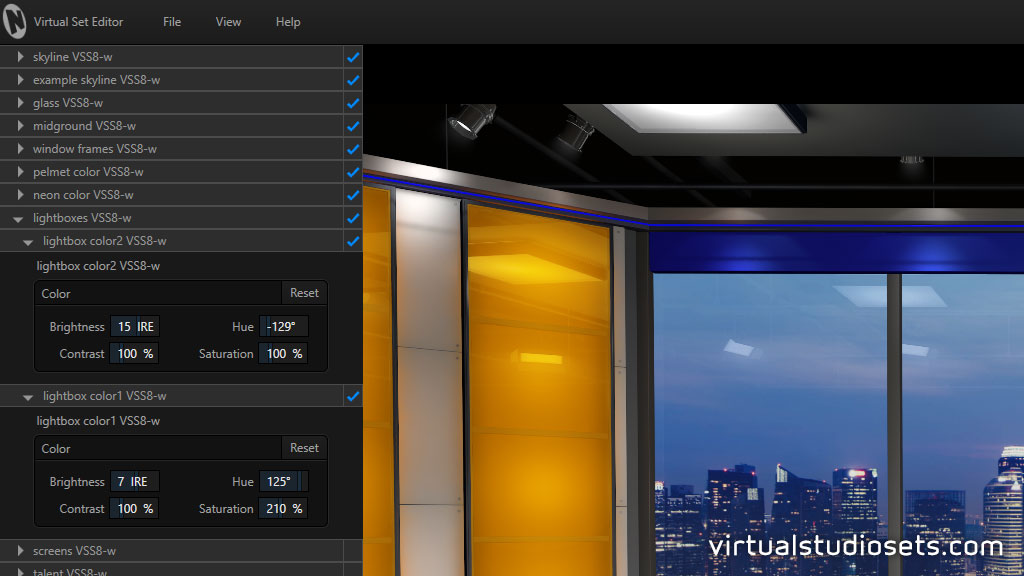
Some of our virtual sets will have two semi-transparent layers that can be used in combination to get some nice realistic effects. In this final example I have made the ‘lightbox color2’ layer red, and the layer above it (‘lightbox color1’) a yellow colour. When the two layers are combined we get a nice orange colour with yellow highlights. You don’t need to use both of these layers, you can turn either of them off if you like, but with two layers to play with you have even more options to (hopefully) create exactly the effect you need.
I hope that has been useful. If you have any questions, please do get in touch.
Mike,
Virtual Studio Sets