Changing colours in a vMix virtual set using the Photoshop version
posted by
This tutorial shows you how to change the colours in a vMix virtual set, using the original layers in the Photoshop version.
Let’s say you want to change the colour scheme for Studio 9C.
We will use the ‘wide’ camera angle here, as an example.
First a little bit of background information, so you can get an idea of what we’re trying to achieve here.
vMix virtual sets are essentially a set of image layers with a special configuration file (config.xml) which tells vMix where to position each layer, and in what order. vMix has a limit of 10 layers for its virtual sets, and those 10 layers include any inputs for talent, screen content and so on. In order to keep within this 10 layer limit, some of our vMix virtual sets might have some of the original layers combined (merged) into a single image, which can sometimes make it a little more challenging if you want to change the various coloured areas individually. For example, the vMix versions of Studio 9C will have the main set, and the lightboxes, and the little neon strips, all merged into a single ‘midground’ layer.
So, basically, we want to do three things:
1. Find the layer inside the vMix version that we want to adjust. (This will usually be the ‘midground’ layer).
2. Create a new colour scheme using the Photoshop version.
3. Replace the original vMix layer with a new one exported from the (adjusted) Photoshop version.
Before we do anything, I would recommend that you make a back-up of your files for safety. The easiest way to replace the original vMix layer is simply to over-write the file with a new one. But if anything goes wrong, or you want to revert back to the original version you will have lost your original, so it’s very important to keep a back-up! You could make a complete copy and work on the copied version, so your originals are always safe!
OK. Let’s begin.
1. Find the layer in the vMix version
First, take a look in the vMix folder for the wide angle of Studio 9C (the folder is called ‘VSS9C-4K-wide-vMix-set’).
We are looking for the ‘midground’ layer. This is the layer that has the main studio set, plus all of the lighting elements, merged into a single PNG-format image (it’s called VSS9C-midground-w.png). If you open it in Photoshop you see that it looks like this (see image below). You can see in the Layers panel that it’s definitely a single layer. Notice that the desk and screens aren’t visible, and the windows are transparent.
The first thing you could try is to change the colours on this single layer – you may be able to get exactly what you want without having to use the Photoshop version at all. Maybe try Image > Adjustments > Hue/Saturation and adjust the ‘Hue’ slider. If you get something you like, then ‘Save’ and you’re good to go!
If you can’t get exactly the look you’re after, you’ll need to recreate an image just like this one, but using some of the separate lighting layers in the Photoshop version…
‘Midground’ layer from the vMix version of Studio 9C (wide), opened in Photoshop
2. Creating a new colour scheme using the Photoshop version.
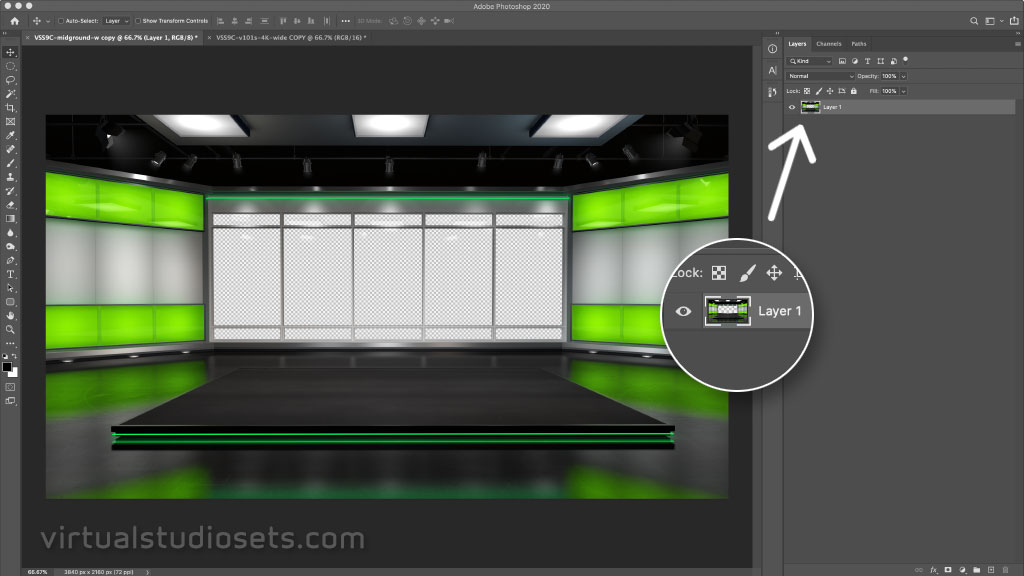
2. OK, so now we’ll need to open the equivalent Photoshop file. It will be called something like ‘VSS9C-4K-wide.psd’. The filename may include a version number too, but the important thing is that it ends with ‘.psd’ (which stands for ‘PhotoShop Document’). Don’t panic when you open it in Photoshop and see only a logo on a white background! This is just a separate layer with our logo and URL – it’s right at the top of the Layers list, so it’s currently in front of all the other layers. Go to the ‘Layers’ panel, and click the little eyeball icon to turn that layer OFF.
![]()
the top layer is just a logo. Turn it off to see all the other layers!
Now you should see all the other layers below.
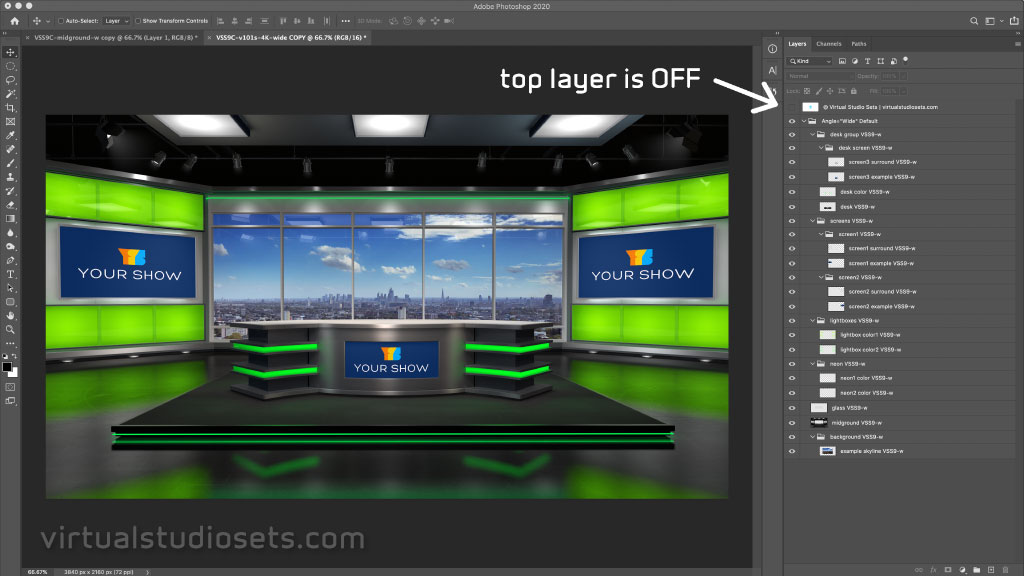
Photoshop version (with top layer turned OFF)
OK, so the first thing we can do here is to turn OFF all the layers we don’t need. We want to end up with only the layers visible that belong in our vMix version. You’ll see some of the layers are grouped together – that should make it a bit easier to turn off the ‘desk group’, ‘screens’ and ‘background’. We don’t need those. The only layers we want to see are ‘lightboxes’, ‘neon’, ‘glass’ and ‘midground’. You will end up with something like this (see image below). You can double check that it matches the vMix ‘midground’ image. It should be exactly the same as we haven’t changed any colours yet.
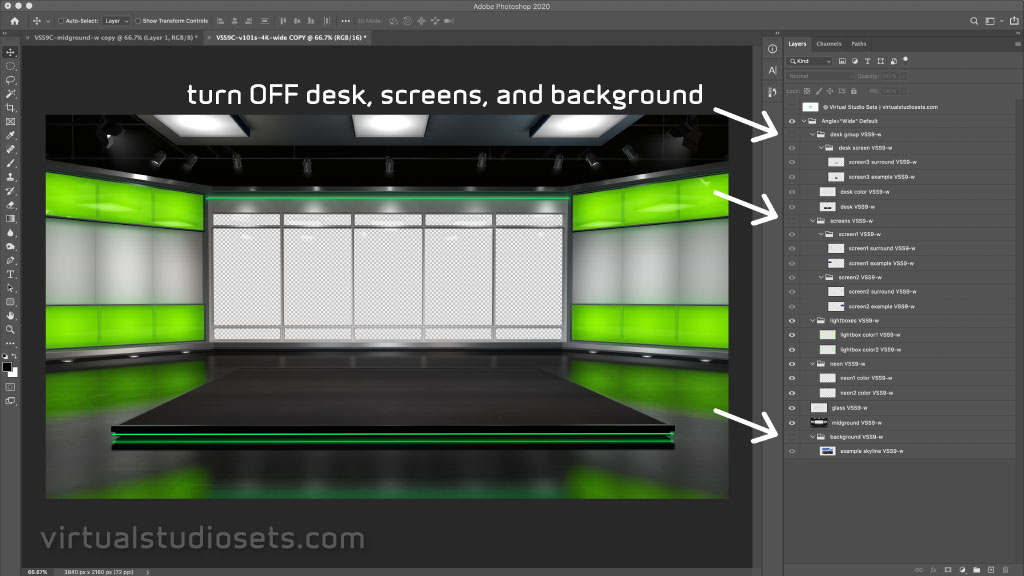
Photoshop version – only the ‘midground’ layers are visible
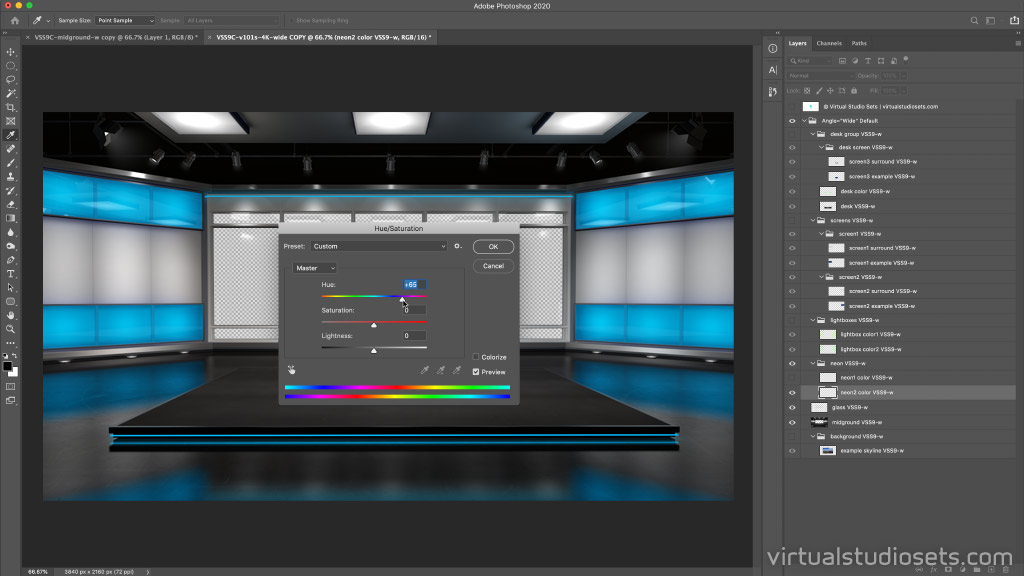
Next we can go through and change some colours for the layers that are showing. You could maybe do each layer one at a time, by hiding the others. For example, if we hide the lightboxes, and the ‘neon1’ layer we can concentrate on the ‘neon2 color’ layer – it’s the neon strip around the floor riser. I still think the quickest and easiest way to change this colour is using ‘Hue/Saturation’ (Image > Adjustments > Hue/Saturation), but there are many many other options in Photoshop for making colour adjustments. Use the ‘Hue’ slider to get the colour you’d like. In the example below, I have adjusted the hue by +65 to get this blue colour. Make a note of everything you change – you may need to adjust the colours for the other camera angles, and you’ll want to have everything matching nicely!
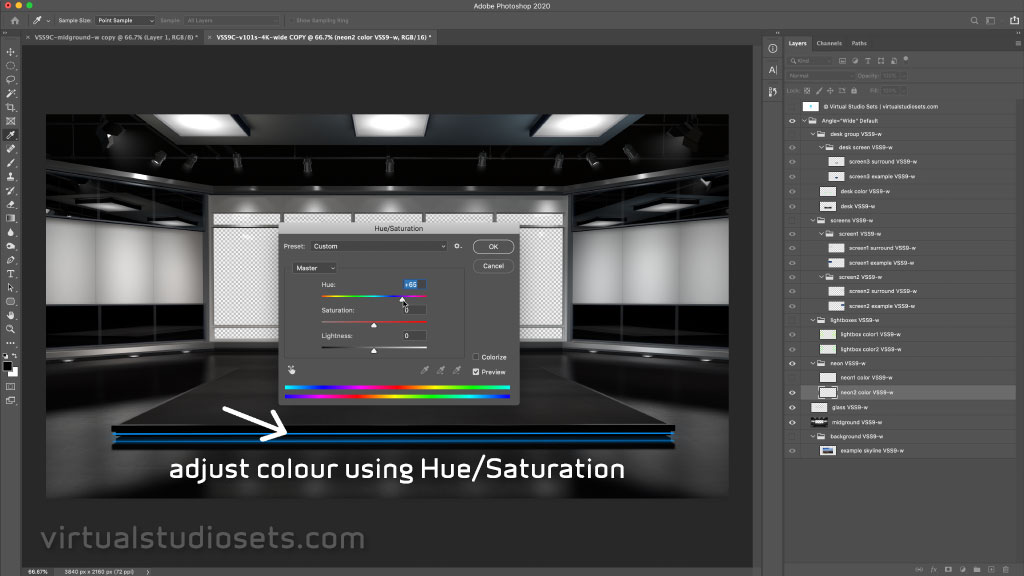
adjusting Hue/Saturation on a single layer (neon2)
You can continue adjusting colours on different layers, until you’re happy with the result.
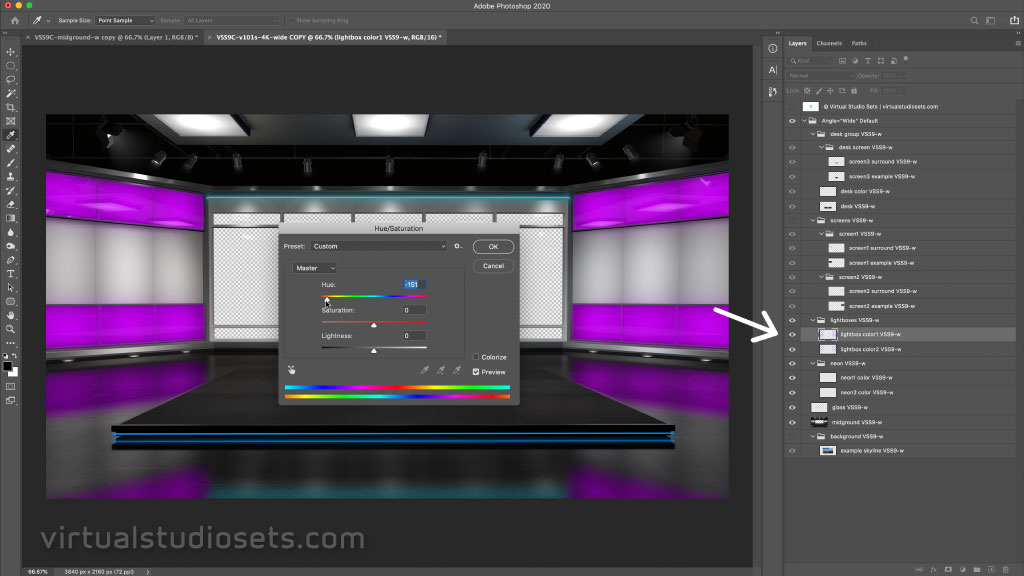
adjusting Hue/Saturation (continued)
3. Exporting from Photoshop.
OK – this is where we have to be a little bit careful. We want to replace the layer in the vMix version with our new one. It might be an idea at this point to save the changes you’ve made to the Photoshop version. Maybe give it a new name so you can find it again if you need to. The other reason for saving the Photoshop file with all the individual layers still intact is that we now need to merge all of the VISIBLE layers into single image. We are going to over-write the old vMix layer with this new one. The image size must be exactly the same, and it needs to be a PNG image (NOT a Photoshop file!).
So – to create a new PNG layer from the Photoshop file you have a couple of options. Both methods are quite slow, so be patient!
The first is to use the legacy ‘Export to Web’ option (File > Export > Save for Web (Legacy)
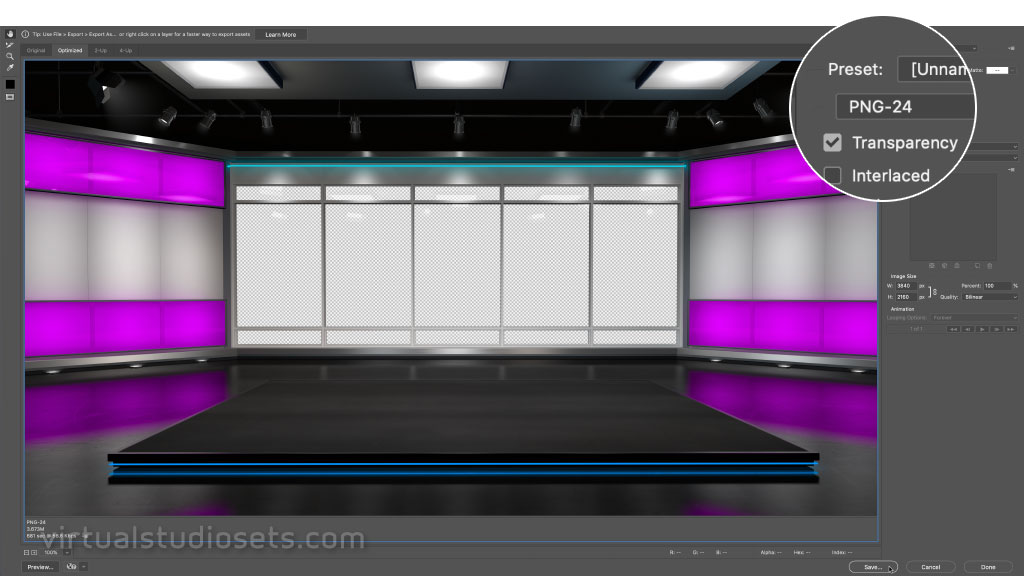
Save for Web (Legacy)
Make sure you leave the image size the same, choose ‘PNG-24’ as the preset file format, and make sure that the ‘Transparency’ box is checked. When you click ‘Save’ you need to navigate to the folder you found earlier in (1) which has the vMix layer you want to change, and over-write the midground PNG layer (VSS9C-midground-w.png)
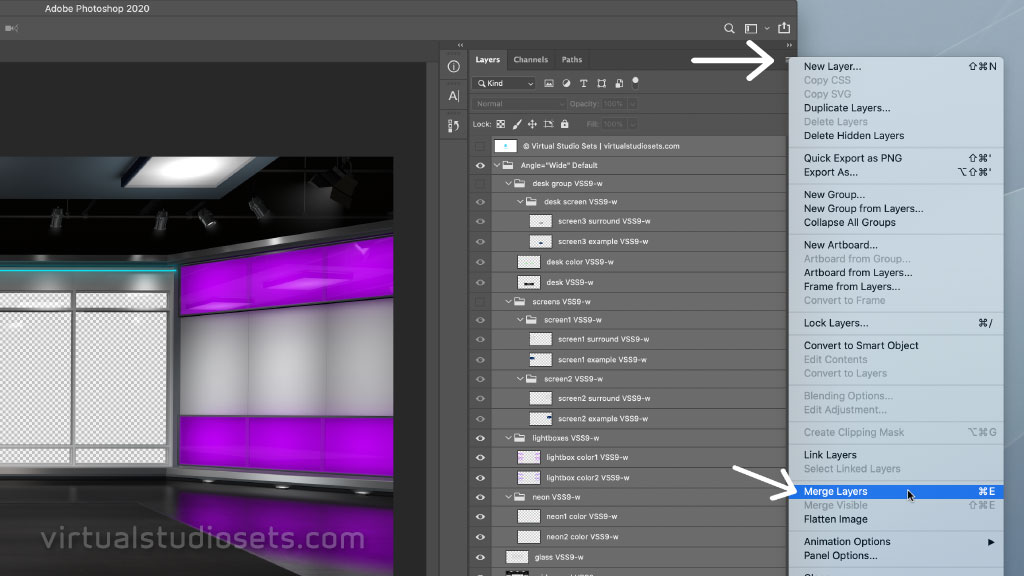
Merge Layers
Another way of exporting the Photoshop image as a PNG layer is to merge all the visible layers together. First select all the layers (even the hidden ones) (Select > All Layers). Then use the little drop-down menu on the layers panel to select ‘Merge Layers’. (Do NOT ‘Flatten Image’, as that will lose all of the transparent areas). Then you can either use the Save for Web option as above, or you can choose File > Save As (make sure to select PNG from the ‘Format’ drop-down!) and over-write the vMix midground layer that way.
Remember you’ll need to copy this new version over to your vMix machine – and maybe even restart vMix so it definitely picks up the new one.
Finally…
One last thing. Some of our vMix virtual sets will have been optimised for performance and it’s possible that some of the layers in the vMix set are NOT full-frame. But they will most likely be an obvious division of the full-frame image. For example the ‘desk’ layer in Studio 9C is a full-width image (3840px wide) but only half the height (1080px) starting from the bottom of the image. In this case, you will want to crop your Photoshop version (Image > Canvas Size) to the correct dimensions before exporting.
That’s it really. There are plenty of things that can go wrong here, so I wouldn’t necessarily recommend this for a beginner, but once you’ve done it successfully a few times, you should find it quite a simple process. Please do make sure that you are keeping a safety copy of everything, just in case!