Studio 16 : new virtual studio set
posted by
If you’re trying to make your own custom virtual background – look no further!
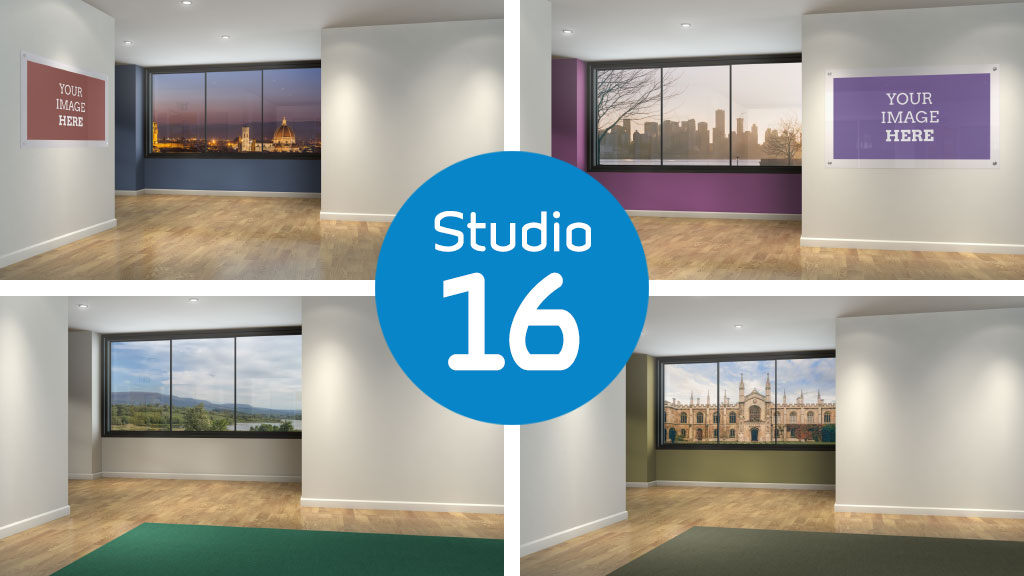
Our latest virtual studio set Studio 16 was originally designed as a custom virtual background construction kit, so you can use it to make your own virtual backgrounds for Zoom, Microsoft Teams, and more.
The main view of Studio 16 was specially created to match a typical camera position and field of view that you’d get from a webcam – so it works really well as a virtual background. Even if you’re sitting close to the camera, or a little further back, the perspective on the virtual background will match really nicely.
Studio 16 comes with layers that you can adjust (wall colour, carpet colour), and areas where you can add your own skyline, and images in the picture frames on the walls, and create your own virtual backgrounds that match your brand perfectly.
YOu can also use Studio 16 as a regular virtual set. It works great for standing talent and interviews too. We’ve even included a set of backgrounds for close-ups, left and right – so if you’re using a 3-camera set-up for your interview, you have everything you need for a wide establishing shot, plus MCU’s for presenter and guest (or guests).
You can watch a short video below which describes Studio 16 in a little more detail:
You can read a transcript of this video below:
Video Transcript:
Hi there,
Here’s a quick look at Studio 16 from virtualstudiosets.com.
This set started out as a kind of ‘virtual background construction kit‘ – it’s designed with a load of separate layers and variants that let you create your own branded backgrounds for Zoom, or Teams, or whatever – so this main shot here is designed to work really nicely with a single person looking straight to camera or a webcam even – with a couple of areas over the shoulder, left and right, where you can add your own images, or logos.
But remember, like all our sets, you can choose to put your people wherever you like really – and if you decide to use this main shot for an interview, say, we’ve also included a load of single background images that you can use for your close-ups.
OK – I’ll quickly run through the various layers that you get in the Photoshop versions – there’s a set of templates with a coloured wall in the background – the coloured section is a separate layer, so you can turn it off to reveal the white wall behind, or leave it on, and use colour correction to match it to your own brand colour. Notice how there’s a subtle reflection in the floor that also changes with it. There’s a separate layer for the carpet section too.
There’s also a set of templates with a window in the background – we’ve included an example skyline behind it – but as with all our sets, you can always replace the skyline with your own image if you like. And there’s a separate glass layer too which adds some nice subtle reflections. The coloured wall section is still a separate layer here so you can still adjust it, or remove it completely.
The picture frames are separate layers too – so you can show one, or both, or neither. And they’re available in different aspect ratios – 16×9 landscape, totally square, and also 16×9 portrait versions. These also have a separate glass layer in front that adds some extra lighting and reflections.
You also get a few ready made backgrounds – they’re ‘quick start’ single layers – with transparent holes for the window and pictures.
We’ve made TriCaster versions too – these have all the separate layers available to you – they’ll all show up in NewTek’s Virtual Set Editor, PLUS you also have UV gradients in place for your Live Inputs which will map a 16×9 source image into the skyline, and the landscape format picture frames. For the square and portrait frames you get two UV versions – one will crop the centre section from the source image – and the other will horizontally scale the whole image to fit.
You get both of those mapping options in the vMix versions too. Just a quick word about the vMix versions – to keep the number of layers a little bit more manageable, the midground layer here includes the wall colour, the carpet, and the window glass merged into a single image. The picture frames also have that glass layer built in. But as usual, you can use the Photoshop versions, where all the layers are separate, to create your own variations.
OK – so that’s Studio 16 – thanks very much for watching!
As always, if you have any questions about any of our virtual sets, please do get in touch.